Unit 3: Git Basics
Welcome to Unit 3
This unit, we'll be combining what we've done in the past 2 units, to learn more about Git, and how you can use it in your terminal.
Unit 3 Lecture Video
Git
🤔 Why Git?
And why not Google Drive? 🤨👎
A reason why Google Docs has become so popular because it made an easy way for a team to collaborate on a document together. A powerful tool Google Docs provides is revision history which gives document owners a way to view and manage past versions of the document. This can be called version control.
Git is the leading form of version control for source code. It is built around the importance of tracking changes and managing collaboration. These features make Git the right tool for programming small and large projects. While it may be unfamiliar to you now, Git is one of the most used technologies across any area of software development so stick through it and you will reap the benefits later on.
The Git Workflow
What is a repository?
A repository (also known as repo), is a collection of source code. It will contain all your project's files and revision history.
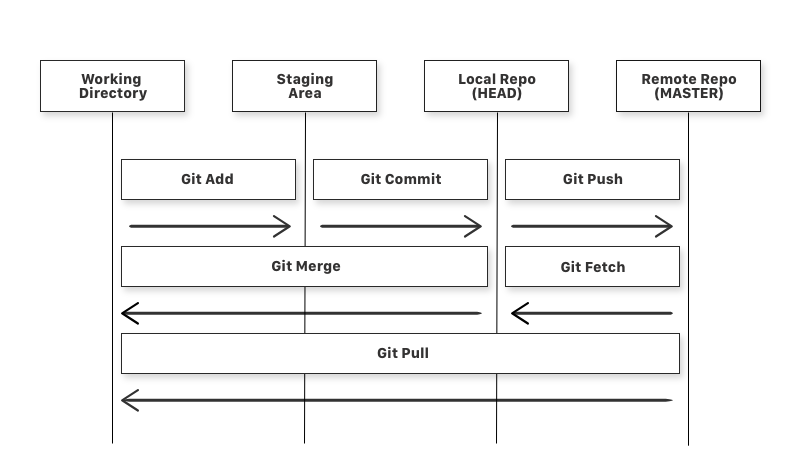
When working with Git, there are 4 fundamental elements: Working Directory, Staging Area, Local Repo, and Remote Repo.
- Working Directory - Your working directory are the files on your computer.
- Staging Area - Once you make changes to a file, you can add it to the Staging Area, meaning that the file is ready to be committed.
- Local Repo - Your local repo is stored on your computer, and is a clone of the Remote Repo.
- Remote Repo - The remote repo is the repository, but it's stored on a server miles away (such as GitHub).
Git Commands
| Commands | Function |
|---|---|
| git clone <remote_repo_url> | Creates a clone of the remote repository on your local computer. |
| git init | Create a new git repository (note: you don't need to do this if you use clone) |
| git status | Lists all new or modified files to be committed. |
| git add <file_name> | Adds specified files into the staging area, ready to be committed. |
| git commit -m "COMMIT_MESSAGE" | Commits the staged files into your local repository. |
| git log | Prints the commit history of your current repository. |
| git push | Pushes the commits on your local repository to the remote repository. |
| git fetch | Updates ONLY your local repository with changes in the remote repository. |
| git pull | Updates your local repository AND working directory with any changes from the remote repository. |
.gitconfig
The ~/.gitconfig file lives in your root directory (not in a repo) and stores user-specific configuration. You'll want to update your email and name for this file by typing the following lines into your terminal:
# Set your email and name
git config --global user.email "your_email@example.com"
git config --global user.name "FIRSTNAME LASTNAME"

# Set your default branch to main (instead of master)
git config --global init.defaultBranch main

# Verify your changes took effect
git config --list
.gitignore
The .gitignore file is a text file inside of a repository that tells Git which files or folders to ignore in a project.
Writing in this file follow patterns you can use.
*is used as a wildcard match/is used to ignore pathnames relative to the.gitignorefile#is used to add comments to a.gitignorefile
Examples
# Ignore Mac system files
.DS_store

# Ignore all text files
*.txt

# Ignore /env folder in same directory
/env
SSH Keys
SSH, also known as Secure Shell, is a way to let users access and authenticate to a computer remotely. SSH keys are used to authenticate users when trying to access other computers. With a pair of public and private keys, SSH can securely communicate remotely between machines.
Why are we using SSH?
When we are working with our GitHub repository, you will need to identify yourself with your username and personal access token. With SSH keys, you can connect to GitHub without supplying your username and password each time. To use SSH with GitHub, you will need to create the key, then add it to your GitHub account.
💡 As of August 13, 2021, GitHub no longer supports https password authentication. You must use SSH moving forward.
To create an SSH Key
- Open the Terminal
- Paste the text below, substituting in your GitHub email address:
ssh-keygen -t ed25519 -C “your_email@example.com” - You can enter a passphrase or leave it blank. A passphrase is not necessary but can add additional security. If you add a passphrase, then you will need to type in that phrase every time you use ssh. (Personally, I don't use a passphrase)
Viewing your SSH Key
You can now find your keys at ~/.ssh
If you used the ed25519 algorithm to create your key, you should see 2 files:
id_ed25519- Your private key. Do not share this ❌id_ed25519.pub- Your public key. This is what you share will GitHub ✅
Adding your SSH Key to GitHub
- Display your public key using the
catcommand.cat ~/.ssh/id_ed25519.pub - Copy your public key to your clipboard.
- On github.com, click on your profile photo in the upper-right and then click settings.
- Click on SSH and GPG Keys, and hit New SSH Key.
- In the title field, add a descriptive label, related to your computer, i.e. “Personal Mac”
- Paste your public key into the “Key” field.
- Click Add SSH Key, and your key is now added to your GitHub Account.
Assignment
Required Tasks
- Add your SSH Key to GitHub
- Clone your Profile README and push some changes (at least 1 new commit).
- Create a new repository for your personal website.
- Create an
index.htmlfile - Create a
README.mdfile (it's ok if there's not much in there for now)
- Create an
Optional Stretch Goals
- Create a
.gitignorefile in your personal website repo. - Add your SSH Key to OpenLab
To do this: connect to OpenLab and add your public ssh key as a newline in
.ssh/authorized_keys
Submission
Complete the Google Form.
External Resources
Git
- Git Reference
- Git Cheat Sheet: Git Cheat Sheet
SSH
- How to create a new SSH Key: Create SSH Key Documentation
- How to add an SSH Key to GitHub: Add SSH Key Documentation